[討論] Compare digital camera sensor sizes: full frame 35mm, APS-C, 4/3, 1″-Type
kenny wang2015-5-28 22:46
http://photoseek.com/2013/compare-digital-camera-sensor-sizes-full-frame-35mm-aps-c-micro-four-thirds-1-inch-type/
To optimize the portability of a serious travel camera, consider APS-C sensor size or as small as 1-inch Type sensor (recommended here: BUY>CAMERAS). The archaic inch-sizing of sensors is clarified in the illustration and table below with relative sizes and millimeters.
Recent digital sensor improvements have shrunk cameras and increased zoom ranges while preserving image quality. These days, evocative images can clearly be captured with most any decent camera, even as small as a good iPhone or Nokia Lumia smartphone. But if you ever want large prints and more control, get a bigger camera. For a given year of technological advance, a camera with physically bigger sensor area should tend to capture better image quality (by gathering more light), but at the cost of larger-diameter, bulkier lenses than a smaller-sensor camera system.
In the illustration below, compare digital camera sensor sizes: full frame 35mm, APS-C, Micro Four Thirds, 1-inch, 1/1.7″ and 1/2.5” Type.
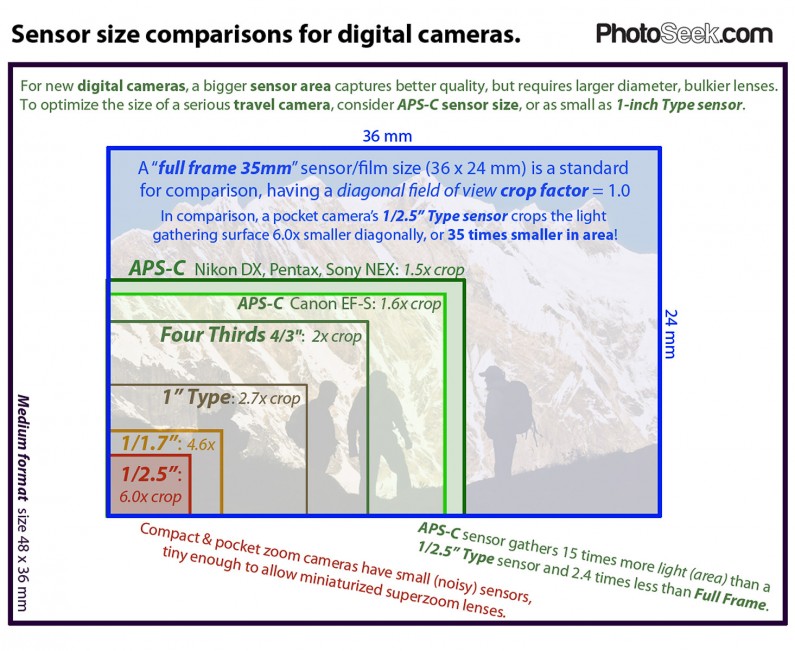
Compare digital camera sensor sizes overlaid together: full frame 35mm, APS-C, Micro Four Thirds, 1-inch, 1/1.7″, 1/2.5” Type. (Above, the relative sensor proportions are true, but greatly enlarged for easier viewing.)
Examples of great travel cameras with optimal sensor sizeThe best two-pound 11x zoom travel system of 2014-15 is Sony A6000 (12 oz, with 24mp APS-C sensor) with Sony 18-200mm OSS lens (18.5 oz, 27-300mm equiv). Improving its quality across the same zoom range would require a heavier set of prime (non-zoom) lenses or a larger-sensor camera (such as the full-frame-sensor Sony Alpha A7 Mirrorless) requiring bulkier lenses. Click here for my latest camera recommendations.
From 2012 to the present, I have been traveling with the earlier mirrorless Sony NEX-7 camera with 18-200mm lens with APS-C sensor (23.5 x 15.6 mm) and electronic viewfinder (EVF). I also carry a pocket-sized Sony DSC-RX100 camera, which justifies its price premium by ingeniously packing a 1-inch Type sensor (13.2 x 8.8 mm) with a light-gathering area several times bigger than its peers. The revolutionary 20-megapixel Sony RX100 captures great wide-angle close-focus shots (macro) and also landscape photo quality beating my 3-times-bulkier camera of 2009:
- Surprisingly, studio tests show that a little 8.5-ounce Sony RX100 version I (2012) can beat or equal image quality from a 29-ounce Nikon D5000 DSLR with kit lens (12mp APS-C sensor, 2009) from ISO 200 up to 1600.
- Best 33-oz portable 810mm-equiv telephoto system: Nikon 1 V3 camera (2014, 14-oz body, 1″-Type sensor 18mp) mounting a Nikkor CX-format VR 70-300mm f/4.5-5.6 lens (19 oz, 189-810mm equiv) with blazingly fast hybrid autofocus and unusually sharp optics, a breakthrough for birders and travelers. For flexibility, buy it with 10-30mm kit lens (3 oz).
How to compare cameras
- The BUY>CAMERAS menu updates my Light Travel camera recommendations several times per year.
- I judge image quality and resolution not by megapixel (mp) count but instead by comparing standardized studio test views at 100% pixel enlargement and checking resolvable lines per picture height (LPH) − see dpreview.com and handy Comparometer at imaging-resource.com. Check other review sites analyzing a camera’s telephoto in addition to standard lens.
- I like to “pixel-peep” a side-by-side comparison of two different cameras capturing the same subject under same lighting conditions. Be sure to mentally (or physically) normalize any two given shots to compare their fine detail as if printed with equal overall image size.
- Even better, compare cameras shot side-by-side under a variety of actual field conditions (which I do just before selling a former camera to confirm the quality of the new replacement camera).
Smartphones have even tinier sensors such as 1/3.0″ Type (4.8 mm x 3.6 mm) in iPhone 5S. Top smartphone cameras (as in the Nokia Lumia 1020 and Apple iPhone 5S of 2013 in the table below) have improved miniature sensors to the point where citizen journalists can capture newsworthy photos with image quality (debatably) good enough for fast sharing and quick international publication.
Click here for a great perspective on how far image quality has progressed from early DSLR to 2014 smartphone cameras. While I don’t use a smartphone camera myself, evocative images can clearly be captured with most any decent camera. The “best” travel camera is the one that you are willing to carry. But tiny-sensor cameras have considerable limitations compared to physically larger cameras in terms of print enlargement, autofocus speed, blurred performance in dim or indoor light, and so forth.
More details:The non-standardized fractional-inch sensor sizing labels such as 1/2.5-inch Type and 1/1.7″ Type confusingly refer to antiquated 1950s-1980s vacuum tubes. When you see those archaic “inch” size labels, instead look up the actual length and width in millimeters reported in the specifications for each camera:
Table of camera sensor size, area, and diagonal crop factor relative to 35mm full-frame
Sensor Type | Diagonal (mm) | Width (mm) | Height (mm) | Sensor Area (in square millimeters) | Full frame sensor area is x times bigger | Diagonal crop factor* versus full frame |
| 1/3.2″ (Apple iPhone 5 smartphone 2012) | 5.68 | 4.54 | 3.42 | 15.50 | 55 | 7.61 |
| 1/3.0″ (Apple iPhone 5S smartphone 2013) | 6.00 | 4.80 | 3.60 | 17.30 | 50 | 7.2 |
1/2.5″ Type | 7.18 | 5.76 | 4.29 | 24.70 | 35 | 6.02 |
1/2.3″ Type (Canon PowerShot SX280HS, Olympus Tough TG-2) | 7.66 | 6.17 | 4.56 | 28.07 | 31 | 5.64 |
1/1.7″ (Canon PowerShot S95, S100, S110, S120) | 9.30 | 7.44 | 5.58 | 41.51 | 21 | 4.65 |
1/1.7″ (Pentax Q7) | 9.50 | 7.60 | 5.70 | 43.30 | 20 | 4.55 |
2/3″ (Nokia Lumia 1020 smartphone with 41mp camera, Fujifilm X-S1, X20, XF1) | 11.00 | 8.80 | 6.60 | 58.10 | 15 | 3.93 |
Standard 16mm Film Frame | 12.7 | 10.26 | 7.49 | 76.85 | 11 | 3.41 |
1” Type (Sony RX100 & RX10, Nikon CX, Panasonic FZ1000) | 15.86 | 13.20 | 8.80 | 116 | 7.4 | 2.72 |
Micro Four Thirds, 4/3 | 21.60 | 17.30 | 13 | 225 | 3.8 | 2.00 |
APS-C: Canon EF-S | 26.70 | 22.20 | 14.80 | 329 | 2.6 | 1.62 |
APS-C: Nikon DX, Sony NEX/Alpha DT, Pentax K | 28.2 – 28.4 | 23.6 – 23.7 | 15.60 | 368 – 370 | 2.3 | 1.52 – 1.54 |
35mm full-frame (Nikon FX, Sony Alpha/Alpha FE, Canon EF) | 43.2 – 43.3 | 36 | 23.9 – 24.3 | 860 – 864 | 1.0 | 1.0 |
Kodak KAF 39000 CCD Medium Format | 61.30 | 49 | 36.80 | 1803 | 0.48 | 0.71 |
Hasselblad H5D-60 Medium Format | 67.08 | 53.7 | 40.2 | 2159 | 0.40 | 0.65 |
Phase One P 65+, IQ160, IQ180 | 67.40 | 53.90 | 40.40 | 2178 | 0.39 | 0.64 |
IMAX Film Frame | 87.91 | 70.41 | 52.63 | 3706 | 0.23 | 0.49 |
With early DSLR cameras, many photographers were concerned about the loss of image quality or resolution by using a digital sensor with a light-gathering area smaller than 35mm film. However, for my photography, APS-C-size sensor improvements easily surpassed my scanning of 35mm film by 2009.
An interesting number for comparing cameras is “Full frame sensor area is x times bigger” in the above table.
- In comparison to full a frame sensor, a pocket camera’s 1/2.5-inch Type sensor crops the light gathering surface 6.0 times smaller diagonally, or 35 times smaller in area.
- An APS-C size sensor gathers about 15 times more light (area) than a 1/2.5” Type sensor and 2.4 times less than full frame.
- APS-C sensors in Nikon DX, Pentax, and Sony NEX have 1.5x diagonal field of view crop factor.
- APS-C sensors in Canon EF-S DSLRs have 1.6x diagonal field of view crop factor.
- 1 stop is a doubling or halving of the amount of gathered light. Doubling a sensor’s area theoretically gathers one stop more light.
Landscape photographers often prefer to capture a deep depth of focus, which can be achieved with both small and large sensor cameras (often optimally sharp using a middle aperture F number value such as f/4 to f/5.6 on 1-inch Type sensor or f/8 on APS-C, while avoiding the diffraction of small pupil openings at high F number values such as f/22 on APS-C or full-frame).
To maximize raw dynamic range of brightness values from bright to dark, use base ISO (around ISO 100 or 200 in most digital still cameras), rather than higher ISO settings which amplify noise (blotchiness at the pixel level, most-visibly in shadows). However, using the latest full-frame sensors at high ISO values 6400+ can capture unprecedentedly low noise and open new possibilities for dim-light action photography at hand-held shutter speeds, indoors or at night.
Without the help of a flash, night and dim indoor photography is best with a full-frame sensor to gather more light with less noise. Low-noise night photography is usually best shot on a tripod at slow shutter speeds in raw format between ISO 100 and 800 (or as high as 1600-3200 on the latest large sensors).
For a given year of technological advance, cameras with larger sensors typically capture a wider dynamic range of brightness values from bright to dark per image than smaller sensors, with less noise. Camera raw format allows editing recovery of several stops of highlight and shadow detail which would be lost (truncated) in JPEG file format (if overexposed or underexposed). Alternatively, PC software or camera firmware using HDR (High Dynamic Range) imaging lets any size sensor greatly increase an image’s dynamic range by combining multiple exposures; but for me, the great dynamic range of a single raw file (from APS-C sensor) usually makes shooting extra images for HDR unnecessary.
Despite advanced circuitry, cameras are not smart enough to know which subjects are supposed to be white, black, or midtone in brightness. By default, all cameras underexpose snowy scenes and overexpose highlights within a predominantly dark scene. To correctly expose for all tones, you need to lock exposure upon an actual midtone (such as middle-green grass or a gray card) in the same light as your framed subject.
For greatest editing flexibility, rather than shooting JPEG format, serious photographers should record and edit images in raw format, which is supported in advanced cameras but often not in small-sensor devices. Editing raw format fully recovers badly-exposed images − allowing you to “point and shoot” more freely than with JPEG. Even so, I carefully shoot to expose each histogram to the far right while avoiding truncation of highlights, in order to capture the highest signal-to-noise ratio in each scene (close to base ISO 100 or 200). I typically first shoot a test shot on automatic Aperture-preferred priority, inspect the histogram, check any blinking highlight warnings, then compensate subsequent shots using Manual Exposure (or temporary Exposure Lock grabbed from the scene). Tonal editing of JPEGs can quickly truncate color channels or accumulate round-off errors, often making the image appear pasty, pixelated, or posterized. White Balance (Color Balance) is easily adjustable after shooting raw files, but tonal editing often skews colors oddly in JPEG. 12-bit Raw format has 16 times the tonal editing headroom and color accuracy compared to JPEG (which has only 8 bits per pixel per red, green, or blue color channel). In their favor, automatic point-and-shoot JPEG camera exposure modes get smarter every year, making advanced larger cameras less necessary for many people.
How can we distinguish the image quality captured by different cameras? Images are best compared at a normalized pixel level (with fine detail examined on a monitor as if printed with equal overall image size) after shooting side-by-side in the field with comparable lens and shutter speed settings. Consider two sibling full-frame-sensor cameras:
- Sony Alpha A7S (12 mp of large-bucket photosites optimized for high ISO, low light, and videography plus stills, new in 2015) versus
- Sony Alpha A7R (36 megapixels of smaller-bucket photosites optimized for high resolution, new in 2014)
For travel photography, a full-frame-sensor camera costs you extra money and bulky size. If you rarely shoot higher than ISO 3200 and seldom print images larger than 2 or 3 feet in size, then consider a cheaper and smaller APS-C-sensor camera with excellent dynamic range and advanced autofocus capabilities such as a 24mp Sony A6000.
看完這篇,還是不了解感光元件1/2.3",1/1.9"代表什麼意義?
有了解感光元件的可以回答!
望、聞、問、切,為識病之要道
望以目察,聞以耳占、問以言審、切以指參,明斯診道,識病根源,能合色脈,
檢舉
回應
望以目察,聞以耳占、問以言審、切以指參,明斯診道,識病根源,能合色脈,
Hank Hung2015-5-28 23:44
全英文的可能會帶來一些閱讀障礙XD
建議可以參考這篇
http://www.lazybox.com.tw/forum/fancystuff/photodiary/4620-32--
圖文解說相信會更容易了解!
簡單的說感光元件(片幅)越大感光能力越好,
就好比夜視能力一樣不用高ISO也可以得到更明亮清楚的細節,
例如M8就是採用1吋的感光元件所以就宣稱可以提升300%的近光量,但M9就又退回到1/2.4大小的感光元件了...
畢竟又要達到2千萬畫素又要做到1吋感光元件,
那手機可是會非常厚!!
可以參考Panasonic的CM1就是1吋又2千萬畫素的相(手)機厚度高達2公分!
除了技術改進以外目前的現況就只能從厚度和元件大小中間去取捨了~
-----------------------------------------------------------
修正以上錯誤...
M8的感光元件只有1/3吋比M9來得小,
是因為將畫素從1.1µm提升到2µm才得到300%近光量效果。
傳達錯誤資訊真的很抱歉...
本文章最後由( Hank Hung )於 2015-5-29 13:11 編輯

nicowww222025-6-19 02:30
Sport shirts combine functionality with style, making them perfect for both workouts and casual wear. They are crafted from lightweight, quick-drying materials to keep you cool and comfortable throughout your activity. With various fits and designs available, sport shirts cater to athletes and fitness enthusiasts alike.
oliviajames22025-6-26 01:16
Great topic! Comparing digital camera sensor sizes is key to understanding image quality, depth of field, and low-light performance. Full-frame, APS-C, and Micro Four Thirds each have their strengths depending on your photography style. Super helpful for choosing the right gear! Online Casino Schweiz
Eric Menk2025-8-23 19:47
When comparing digital camera sensor sizes like APS-C or 1-inch type, it’s clear that portability plays a huge role for travelers who want quality without the bulk. That’s why exploring guides and tips on blogs like Radosc Podroze can be so helpful, as they not only highlight stunning destinations but also share practical advice on capturing those moments beautifully. Whether you’re checking Townsville pogoda or planning your next big trip, the right gear and insights make all the difference.